Easy Angel Food Cake
Easy Angel Food Cake
So the 4th of July is coming upon us and this dessert fits the bill! Light and refreshing! You'll never use a box again. Make it whatever shape you want and spoon on the yummy topping of your choice... gonna love it!
Easy Angel Food Cake
Yield: 6 – 8 slices
Ingredients:
- 6 large egg whites
- ¾ teaspoon cream of tartar
- ½ cup granulated sugar
- 1/8 teaspoon salt
- ¾ teaspoon vanilla extract
- ¼ teaspoon almond extract
- ¾ cup powdered sugar
- ½ cup cake flour
** Double ingredients for larger cake
Equipment needed:
- Stand up or hand mixer
- Dry measuring cups
- Measuring spoons
- Two small mixing or cereal bowls
- Wire whisk
- Small tube pan (or bundt pan)
- Aluminum foil
- Rubber spatula
- Butter knife
- Small neck bottle or metal funnel
I figured since the 4th of July is coming soon everyone will be looking for a light, easy dessert for that family picnic so I decided to repost this recipe with a few adjustments! Angel food cake is that go to dessert that anyone will eat... with toppings or all by itself, it's one of my favorite summer cakes! My son used to eat the whole thing when he was younger... with his hands! Pretty simple to make with my step by step pics too. As you can see it uses most staples you have in your kitchen too, so gather your supplies and let’s get baking!


Preheat oven to 375 F. Place oven rack slightly lower than half way in oven to allow room for a higher tube pan.
First step is to get your pan ready so that when the batter is ready… so is the pan. I have used a variety of pans for this recipe with great results. The traditional tube pan works well. I have a springform pan with a variety of inserts, but have used a regular sized tube pan too. A bundt pan works great for this smaller recipe as well. I have even used a bread pan to make even slices in a pinch, especially if I want two smaller cakes. A double recipe makes a full tube pan and twelve servings, so depending on the size crowd, you are set! The pan WILL NOT be greased! The egg foam will crawl up the sides of the pan as it bakes. Grease will inhibit this process. The cake will come out of the pan after it cools.. I promise! Also, I usually cut a piece of foil large enough to wrap around the bottom of the pan. Tube pans sometimes warp over time, so it’s better to be cautious rather have an oven to clean if batter seeps out the bottom.


The only part of this recipe that can be a bit tricky is separating egg whites! You can buy a fancy egg separator or use the technique I’ll show you and walk you through now. I always have a few extra eggs in case I tear the whites. The goal is NO YOLKS in the whites or your egg white volume will suffer. Fat inhibits the creation of an egg foam. Angel food cakes are an example of the foam function of eggs in cooking. One way to separate eggs is to tap the egg on the counter lightly; using the side of the bowl works too, but creates a more jagged edge on the shell which might tear the yolk. Then use your thumbs to carefully tear the egg shell apart in the middle, as shown above. Try to keep egg in one half of the shell without breaking the yolk. If the yolk is torn, put it in a bowl to scrambled eggs later! Play mixologist and carefully pour egg into the other half of shell, back and forth until all of the white is removed from the yolk. I use a separate bowl just in case I mess up the white… doesn’t ruin all the whites. Many a time I have fished out yolks with a spoon! Another method, which is much easier, is where you crack the egg open onto your hand and slightly open your fingers, allowing the whites to run through. You wind up holding the yolk as shown above. I keep the yolks for making lemon curd or adding to scrambled eggs in the morning. No need to toss them… they freeze well too.


Whipping egg whites is next! You need stiff whipped egg whites to make the fluffiest cake. Using a stand up mixer or hand mixer, add the cream of tartar and start to beat whites on medium speed until a foam is starting to form, as seen in picture 2. Cream of tartar will help to stabilize the whites as they whip. Now turn speed up to high and beat for about 4 -5 minutes or whites have stiff peaks. Stiff peaks can be seen when you turn off the mixer beater and lift up out of the foam. If the foam follows the beaters and gently folds like an ocean wave as it separates, you have stiff peaks. Don’t under whip the whites to save time… your cake will not rise well!


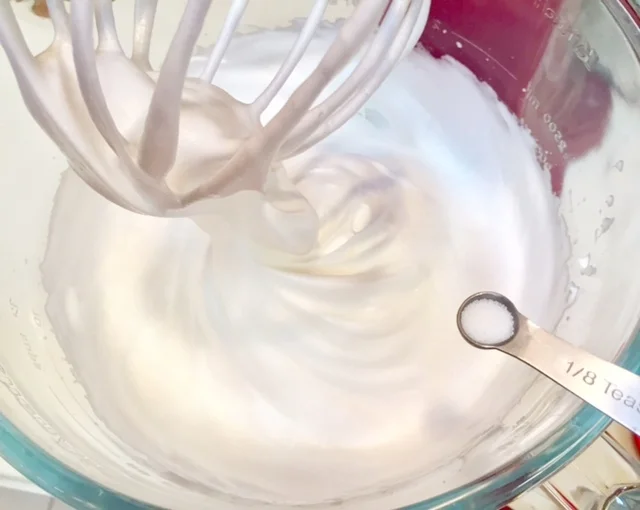


Adding sugar is the next step… slow addition of sugar is KEY! Resist the urge to dump all the sugar in at once. Your egg whites will collapse and you will have a bowl of runny goo. When you have reached the stiff peaks stage, add sugar a couple tablespoons at a time, beating for about 30 seconds between each addition. The egg whites will start to glisten and stiffen with each addition. Before the last addition of sugar, add the extracts and salt. Continue to beat for an additional minute. The egg whites will resemble whipped cream in texture and appearance. Gently scrape down bowl and remove excess egg whites from beaters into the bowl.
While the egg whites are beating, combine the powdered sugar and cake flour into a small bowl and combine well with a wire whisk or fork. You will be adding the dry ingredients to the egg whites about ¼ cup at a time. Resist the temptation to dump it all in as it will be difficult to fold and leave lumps of flour in the batter. Remember… your goal is a fluffy, ‘heavenly’ cake.


Folding is the next step.. not mixing! Sprinkle a quarter cup of dry mixture over the surface of the egg whites. Using a wire whisk, carefully rotate the whisk in a circular motion from the bottom of the bowl, over the top of the whites and back down into the bottom. While folding you are mixing, but not crushing the egg white volume. Regular mixing is a quick, circular motion around the edges of the bowl, where folding is slowly moving the ingredients from the bottom of the bowl up and over the top of the bowl. Go slow and incorporate all the flour until it’s not visible, as shown above. Continue the process two more times until all the flour/ powdered sugar is added. Scrape down sides of the bowl carefully to make sure flour doesn’t remain under neath.


Now it’s time to pan the batter. Grab your prepared pan and gently scoop batter and place it in the pan. Continue all the way around until all the batter is used. Then carefully run a butter knife to cut through the batter and ensure it touches the pan sides and eliminates visible holes. Have made the cake in muffin pans for individual servings or a loaf pan for slices. You are ready to bake your cake! Place tube pan in center of rack of preheated 375 F oven.
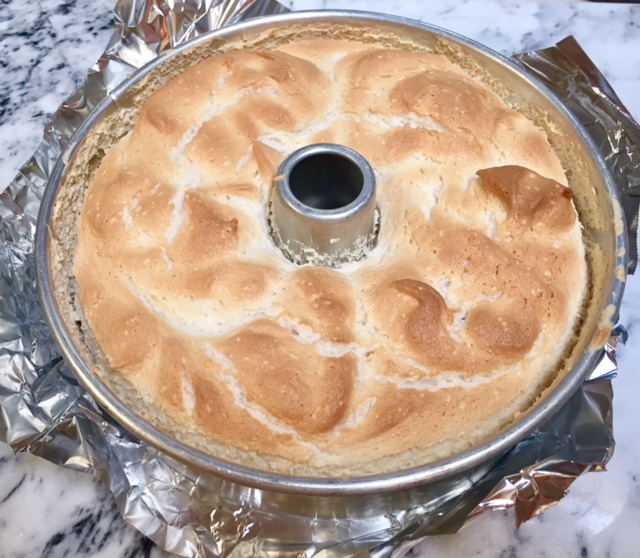


Bake whole cake for 30 – 35 minutes or until cracks feel dry and top springs back when touched lightly. (Cupcakes take about 18 - 20 minutes and loaf pan ~ 30!) Cake top will be golden brown in color. When removing cake from oven, IMMEDIATELY invert cake onto a thin-necked bottle or metal funnel that fits hole of cake pan. Carefully balance cake and allow to hang for at least two hours or completely cooled. Some tube pans are equipped with metal tabs the the pan can be inverted on to hold it in place which eliminates need for a bottle. To cool the cupcakes and loaf pan, I invert using small bowls under the corners of the pan to elevate them from the counter.


After cooled, loosen edges of pan with a knife and lift out inner tube. Loosen bottom and center and gently flip cake off pan. Can be served inverted or baked edge exposed as shown. Spoon berries over top and garnish with whipped cream. Kinda looks like the American flag doesn't it? Happy Fourth of July for sure... Enjoy!

Berry Compote Topping:
Slice one carton strawberries. Add strawberries and one cup blueberries into a medium bowl. Add 1/3 cup brown sugar and 2 tablespoons Triple Sec or Grand Marnier liquor. Stir well and refrigerate for 30 minutes or ready to serve. You can also use strawberries, raspberries, blackberries or blueberries alone too!